Feeds:
Posts
Comments

Archive for July, 2010

Potty Training

Just wanna record a short blog post here about a great great milestone of our little Zachary.

His mummy has decided to potty train him now that he is 19 months old and he is showing some signs that he may be ready to be potty trained. So, after a few days of accustoming him to sitting in the potty, he finally ‘told the truth’ of needing the potty for poo poo and he really poo in the potty. And he also pee once in the potty that very night too. I gave him lots of praises for the accomplishment.

But, I think it would still be a while more to train him for this as he’s still not telling us each time he need to pee yet; he does so more for when he need to poo. And there are times that he pointed to the potty too late and of course, times when he will just point to the potty cause he wants to play with it. Patience…..

Read Full Post »

Gathering @ Pinnacle

Last Saturday, we went for hubby’s JC council gathering at Pinnacle. Nice flats with breath-taking scenery. And we got the chance to go up to the 50th floor roof garden foc. The view was splendid but sadly, I did not bring my DSLR with me to capture the scenery. Shall re-visit this place again for some shooting session.

Our dear Zachary had enjoyed himself tremendously as well. Despite the lack of toys, he had kept himself busy playing with remote controls, coasters, the packet drinks stacked up on the coffee table and mirrors in the house and also with his 5 years old big brother, Aidan. And his slave aka me, was busy chasing him around the house.

Had made some baked chicken wings for the gathering. Used ground all-spices powder, hoisin sauce, brown sugar, soy sauce and crushed lemongrass to marinate before baking them. The subtle spice and lemongrass aroma was really tantalizing for me but it was a pity that they turned soggy by the time it was served to the rest.

It was heartwarming each time you see how fast the little ones grow up since the last gathering. And very soon, we will have 2 more kiddos in this big club.

Read Full Post »

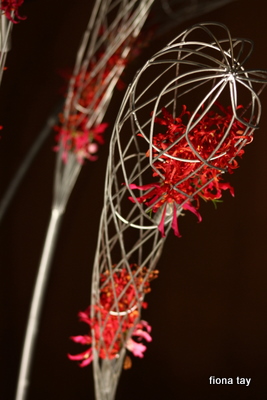
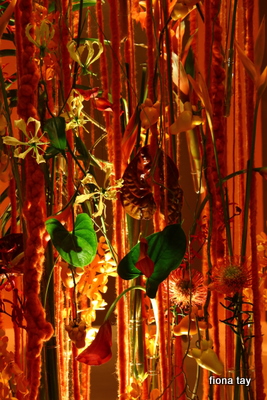
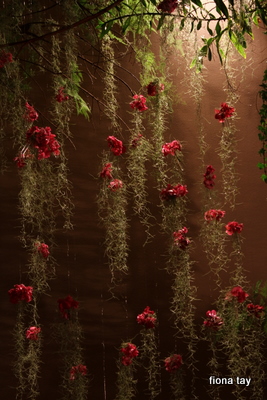
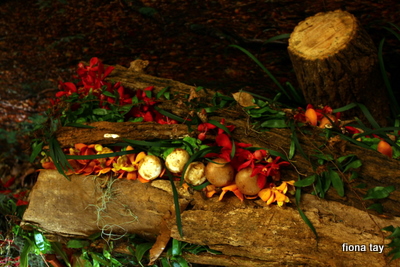
This is a long awaited exhibition. Being a flower lover, this is one that I could never miss. When the last one was held in 2008, I had to sadly give it a miss as I was pregnant then and was told not to walk for long distance and stand for long. But the 2 years wait was definitely well worth it. It was an eye-opening exhibition. Beautiful landscapes, impressive flower arrangement and beautiful structures.

However, I only managed to view one floor of the exhibition as I went during my lunch break. Had actually intended to take a half day off but was not able to. I think I have missed out quite a lot as I had no time to see each and every display carefully. But I still managed to take several photographs which I will pick some to show you here.

The lightings there were pretty dim and hence was quite tricky to shoot (at least for beginners like me). Time was really running short throughout, so there was really not much time to think too long for photo composition and not to say enough time to zoom my eyes into all the details of the beautiful art pieces. But luckily, I had got my nice colleague, Christine, to be there to help me with carrying of the bags and tripod and also to help me look out for some nice shooting angles.

All of these shots taken with my 18-55mm/ f3.5-5.6 and 75-300mm/ f4-5.6; most with tripod. I set my WB to auto and adjusted the exposure slightly to prevent overexposure.

Read Full Post »

First Outdoor Shoot

It has come close to a week since I last written on my blog. I have caught the flu bug last Thurs and it has now spread to Zachary. And as hubby was busy and working late the past few days, it was really not easy for me handling the sick child and doing all household things alone. So there was seriously not much time and energy for any crafting.

Aside for setting enough sleep for myself to get better, I did manage to catch the sunny time last weekends. I thought it was better for me to go out to the park and beach and get some sunshine and breathe some fresh air. So, I finally bought my ‘baby’ with me outdoor and took some shots which I like to share with you here. I just picked some better ones to share (not that these are very nice though :P). Ha ha, my first outdoor shooting attempt. Still a long way to improve on my photography skills.

Shots taken at Fort Canning using 18-55mm lens and tripod.

Playing with shutter speed.


Shots taken at East Coast Beach (I managed to get lots of pictures of Zachary as he was so engrossed with playing the sand; so engrossed that he forgotten to smile throughout) using 50mm/ f1.8 lens.


little ‘sand’ elephant

And not to forget, I would like to thanks my neighbor, Caryn, who has been so sweet to get me some scrapbook pattern papers from her KL trip. I really appreciate!!

Read Full Post »

It has been half a year since I started scrapbooking. And after so long, I finally embarked on designing an album. I dare myself to try out my very first album using an acrylic album. Acrylic album is harder than the usual album in that you have to consider the see through effect and hence you have to consider where to place your photos and embellishment and how the back of the acrylic page would look like. But an acrylic album also offers lot more interesting effect/ look.

This is an album that records our very first trip with Zachary when he was 9 months old and it was to Melbourne. Material used are largely from the Making Memories Panorama Series, which includes the stamp, ribbon, stickers, papers, tags, pins and flowers.

For the entire album, I inked the edges with teal stazon and for most pages, I lined the left edges with the tapes from Making Memories.

Front cover

I outline the edge with silver stickles. I used distress ink to do the compass masking on the PP and I pasted the PP on the back of the cover. On the front of cover, I outline the compass with liquid pearl and did that for the letterings too. I also stamped some edge stamp, travelling texts with Stazon and also added on some travel themes rub-ons. For the flowers, I also added some green stickles. For the Tim Holtz die cut, I have used grungepaper and distressed it with distress inks and rub on with distress stickles and attach the Making Memories ‘Vocation’ tag to it with metal rings. As for the acetate scallop tag attached to the ring, I die cut it from Sizzix scallop tag and emboss it with Tim Holtz texture fade. I then dab it with silver alcohol inks and drop blue alcohol ink randomly on the embossed side. The journey tag metal embellishment tied to the ring is from 7 Gypsies.

Pg 2


I used the aeroplane ribbon as a mask and distressed. The crest die-cut is from Tim Holtz Alteration range.

Pg 3


I used the PP pack packaging which shows the beautiful grid pattern with a hole cut out on the left and I insert a photo in.

Pg 4


I used the Tim Holtz edge die for the strip of PP I placed in middle. Embellish with flowers (with stickles on) and also inserted the flag pin onto the flower.

Pg 5


I stamped the left side of the acrylic page with white stazon. The stamp is travelling theme stamp from Hero Arts.

Pg 6


I left the right side of the frame with the white stamped images uncovered.

Pg 7


Used Tim Holtz edge die cut to die-cut the edge of the pp. I then stamped some travelling theme words with jet black stazon on the arcylic page and EK circle punch to punch out the photos.

Pg 8


Once again, Tim Holtz edge die for the PPs and did faux stitching. For the white space, I masked with distress inks using the Tim Holtz compass mask. Next, I also overlay the embossed acetate sheet with the Tim Holtz Bingo texture plate. The embossed area was lightly distressed with blue distress inks.

Pg 9
I used the car ‘lace’ PP I bought long time ago and mist over it with blue glimmer mist and also added some gold mist for shine. Also, I tied a string round the photo and hang  the 7 Gypsies luggage embellishment

Back cover


Stamp the right hand side of the page using some flower stamp with stazon. I use Martha Steward Punch to punch edge of the blue packaging paper from Making Memories. The ‘Journey Blvd’ was an embossed image (used Orange Zing). And the black flourish was a Maya Road rub-on.

Hope you have enjoyed browsing through with me the entire album. J

Read Full Post »

Green Curry Chicken

Hubby was back on late Friday night from his business trip. To welcome him back, I had cooked one of his favorite Thai dishes, Green Chicken Curry, on Sat noon.

I bought all the fresh ingredients and paste from the Thai supermart at Golden Mile. This place is a treasure place for all things Thai. Things that are hard to find in the other local market/ supermarket in Singapore, you can find them here. For example, the green eggplants, fresh green peppercorns and the Thai basil. So, you could imagine how happy I was when I found all the ingredients and the specific brand of fish sauce, paste etc that I been looking for since some time back.

I love fruits, so I added lots of them in the curry. You can see almost all the ingredients for the Green Curry Chicken here:

The dish itself:

It’s actually not as difficult as you thought to make a curry; that is if you don’t make the curry paste from scratch. My summarized steps for making the curry (serving size about 4 pax):

  •  
    1. Pour about 150ml thick coconut milk into wok and cook till the oil separate out (about 4-5min).
    2. Put about 50g green curry paste and fry till cooked (about 2-3min)
    3. Add the thinly sliced chicken breast meat (about 300g) and cook till it turns white on outer.
    4. Add thinned coconut milk (about 250ml- I thinned the thick coconut milk with water) and when boiling, add ingredients shown on the bigger plate (see picture above) and simmer about 4-5min.
    5. Add about 2 tbsp palm sugar and 30 ml fish sauce and stir till dissolve.
    6. Add rest of ingredients shown inside the bowl (see picture above) and simmer about 3-4min.
    7. Garnish with some thick coconut milk, basil and chilli.

And also like to share with all of you on my newly bought kitchen gadget, the kyocera ceramic knife. It looks plastic to me when I first saw it but it’s actually very sharp; sharper than any knive I have in my kitchen before buying it. I used it for cutting fruits and vegetables with great ease and you can see that the oxidation process is not as fast as when you use normal knive. But it can be fragile, so make sure you don’t drop it on the floor or use it to cut through bones. You won’t want risk damaging it after paying a high price for getting it.

And lastly, I completed my Melbourne Travel Album over the weekend. Finally…So do check back my blog soon for sharing on this album which I have applied lots of techniques in making the album with lots of sizzix dies (mainly Tim holtz range) and lots of Making Memories stuff.

Read Full Post »