Feeds:
Posts
Comments

Archive for May, 2010

Rock salt salmon

Hi everyone

I am home today, organising my scrapping stuff and also packing up for my trip to Chiang Mai tommorrow.

Have been busy over the weekend as usual.  After doing up the carousel, I am just focusing on my trip and clearing up some stuff before leaving. So I have not much to share with all of you. But I am having some great inspiration for making an album when I am back. Can’t wait to start. I hope to finish it soon and share it with you. Also, hoping to find some great places and stuff for my trip and to share with all of you once back. So, do come back to my blog in few days time ya.

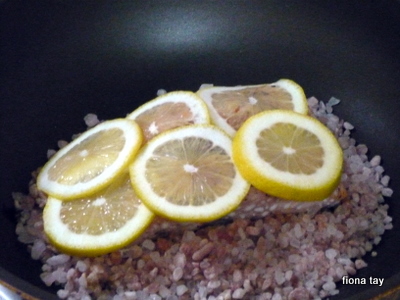
Maybe meanwhile, let me share what I cooked yesterday for dinner. Salmon cooked with rock salt. I have eaten fish cooked with rock salt before and I loved the salty taste. So I decided to adventure into cooking the salmon with the salt. Steps as follow:

1. Put around 1.5 cup of rock salt on pan and heat up for around 5 min.

2. Put salmon (skin side down) on the salt and put lemon slices on top. Let it cook for about 8 to 10 min. At this point, it will still seems little pinkish but the residual heat (see step 3) will cook the fish further.

3. Simmer (away from fire) for about 1-2 min. ( caution: do not eat the skin later as it’s very salty)

Alright, I going to get back to packing. Catch up again soon!

Read Full Post »

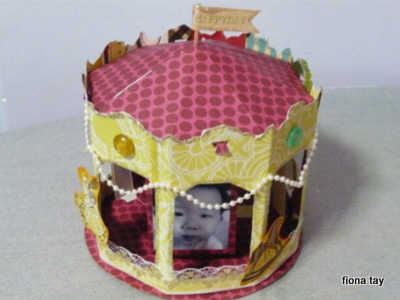
Handmade Carousel

This is my take on Websters’ May challenge on creating a project for display purposes.

Been looking around for inspiration for past weeks. First thought was to do a project using one of the 2 printer’s trays I bought quite awhile ago. But then I wanted to create something different from what others may do. And at last, I remembered the paper carousel that I saw from a café.

Been procrastinating the project for fear that I may not be able to come up with the template or figure out how to do the assembly. But deadline of 31 May is nearing and I have also to prepare for my trip to Chiang Mai next week. So, finally embark on the project the past few days.

Am glad that after 3+ hours of cutting, fixing and lots of modification along the way, the structure of the carousel came out fine and stand well. It was not exactly beautifully done up as I didn’t do a very good cutting job (too impatient when come to cutting) and some parts are bit out of the right proportion.

The core structure of the carousel are made up all from Websters’ papers. Added some sparkle using the gold stickles. Dress up with lace, pearls and websters sparklers. The horses etc on the carousel are cut out from Websters papers.

Found some cute little photos of Zachary and inserted inside the carousel. This project was pretty tough but I enjoyed every moment of making it.

Read Full Post »

A card for daddy

Recently, I have picked up the interest in card marking. I have always admire how others can do such beautiful coloring and blending for the stamped images.Have always used distress inks and nothing  else. Been wanting to attempt coloring and the blending effect with other medium but fearful.

But, I finally picked up the courage last weekend and started my first attempt on the coloring adventure using crayons. I have used Penny Black stamp and color it with water soluble crayons. See what I have done. Not too bad for first coloring attempt, I thought.

I kept the card design simple and followed the ‘Sketch Saturday’ sketch and also Penny Black criteria of using ‘dots’.

Having seen so many scrapbook layouts with banners lately, I tried incorporating them into the card.

This is a card I made for hubby, on behalf of Zachary. Happy Fathers’ Day in advance, hubby.

Read Full Post »


This fortnight challenge by MWL took on a brand new format. No more 12×12 layout but an altered notebook. Criteria as follows: 

  • must have a bracket shape 
  • use buttons
  • at least 2 or more stamped images 
  • use fabric 

    This is my take on the challenge.


I have used a dark brown corduroy fabric to cover the 7 Gypsies Blank Page Notebook. For the bracket-shaped paper, I used a bracket chipboard to trace and cut a white AC cardstock. I inked the cardstock with ‘Rusty Hinge’ distress inks. Next, I stamped rose images (from Prima) and clock images (from 7 Gypsies) with Black Stazon. There’a also a subtle border that I stamped using Stazon metallic copper. For the book spine, I have used 7 Gypsies paper tape.

For the buttons, I inked with copper, silver and brown alcohol inks to create the ‘rusty’ look.

The big stamped image (Tim Holtz) was on the white AC cardstock and I colored it with distress inks (used my fav: rusty hinge, spiced marmalade, antique linen and vintage photo). Next, I applied a layer of rock candy crackle paint on it for the glass crackling look. I adorned on the tatter angel frame inked with the same distress ink colors. 

The clock images are from Graphic 45 which I have inked with Antique Linen distress inks. Also, attached on the spinners from Tim Holtz Ideaology and also the bird charm.

 As for the title, the big ‘M’ is the grungeboard alpha from Tim Holtz inked with Vintage Photo distress ink and words stamp over it. The rest of alphas are die-cut using Tim Holtz Sizzix dies. I also fixed the ‘Wonderful’ Tim Holtz charm with Maya Road pin.

 The notebook has somehow opened up after the alteration. So, I attached the yellow lace ribbon to the cover to ‘close’ it. 

I am intending to fill up the blank journal pages inside with photos and journaling and perhaps this can serve as a keepsakes for hubby to bring along during his overseas trips.

Read Full Post »

Life Journey


My take on the this week Color Room palette 6.


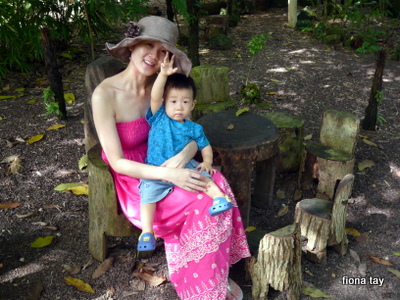
Photos were taken at the playground of the zoo while we were playing the see saw. Zachary was so focus. He’s hardly so as he’s now a very active toddler and he gets easily distracted when playing, eating ….well, basically when doing everything. But as least, the greatest consolation is he hardly throw tantrum and is easily contented.

Back to the LO. I have used Tim Holtz, Basic Grey Capella and Pink Paislee PPs. Love the unique border of PP paper. The main techniques applied for this LO are masking, using Tim Holtz and Tattered Angel masks. For Tim Holtz mask, I have applied ‘Vintage Photo’ distress ink. As for Tattered Angel one, I misted with Jazz Blue.

As for the 2 tags, I stamped one with coffee archival ink. Stamp is from Studio 490. For the other one, I inked with Vintage Photo and stamped white text on it. Rest of stamped images are from Pink Paislee. I have also decorated the stamped images with stickles.

Read Full Post »


We bought Zachary to the Jacobs Ballas Children Garden yesterday morning before the rain came in the afternoon. Hubby had suggested this place recommended by his colleague and he thought is a good place to show Zachary to the flowers and plants. Well, one of this week homework given to Zachary (by the Little Neuro Tree) was to learn about things in the garden.


Was a rather hot morning and we spent like 45 minutes in the park, showing Zachary around. There were actually quite a lot of small families around like us. Our first time there and I would say that it’s a real nice park made specially for the kids (ya, I heard from hubby that you can only enter with kids). 

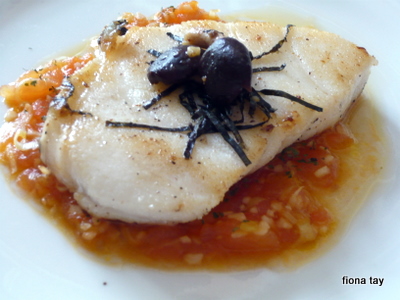
No layout done over the weekend as was quite burnt out doing them over the past weekdays. So, were all resting time and Zachary’s time. But I did manage to cook a decent lunch for hubby yesterday. Pan fried codfish fillet with ginger tomato sauce and willow mushroom. 

My simple steps for the dish as follow: 

  1. pan fry codfish over medium heat till golden brown on both sides
  2. mix some fish sauce (about 10ml), lime juice (about 10ml), sugar (about 1 tbsp) together 
  3. fry crushed garlic, grated ginger, thinly sliced lemongrass with olive oil. 
  4. add the sauce made in step 2 and also the diced tomato and simmer for 5 minutes. 
  5. pour sauce on serving plate, follow by cod fish on top and garnish with shredded seaweed and lightly fried willow mushroom.

Read Full Post »

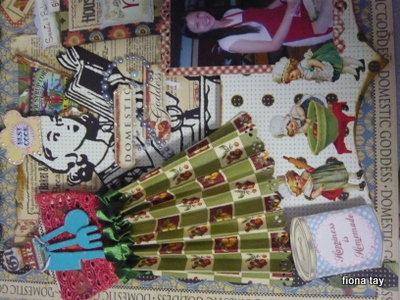
Domestic Goddess


When I saw Edleen’s challenge of using stickers for layout, the first thing that came to my mind was the Crafty Secrets stickers that I bought quite awhile ago.

I have always adore Crafty Secrets stickers, cards and stamps. Very vintage look and sometimes whimsical. I buy them purely for my own collection at lots of times. But this time, I have put them into great use for my ‘Domestic Goddess’ LO.


The other thing that almost came instantly when I decided on the LO was to incorporate the Maya Road dress form chipboard and the cutlery mini chipboard.


I have first covered the dress form chipboard with Graphic 45 PP. Next, made a pleated skirt using Graphic 45 PP. The top was made by wrapping Webster. Also, I created a ‘necklace’ with the maya road cutlery chipboard. Chef Hat was also from Maya Road.

I have also made a ‘recipe container’ and included some ‘recipe sheets’ inside. The tags on the ‘recipe sheets’ are Crafty Secrets stickers. These ‘recipe sheets’ also serve as hidden journaling.


As for the photo for this LO, I wanted to choose one which will be able to match the ‘Domestic Goddess’ theme of this LO. Flipped through some old collection of photos and finally found this most suitable one to use. This is a photo taken four years back during my honeymoon trip to Korea. Me and my darling hubby were having fun time making Kimchi then. At midst of making this LO, I took some time off to browse through the whole album of our honeymoon trip. Beautiful memories…

For info, the material for this LO are mainly: Graphic 45 Domestic Goddess Series, Webster’s Pages, Maya Road Chipboard and Crafty Secrets stickers.

Read Full Post »

Lift Me Challenge 5

Happy Mother’s Day to all. I was busy since last Thurs, celebrating Mother’s day with in-law and also one just with Zachary and hubby. And of course, busy scrapping away.

I was excited when I saw the challenge hosted by Piradee (from MWL). Thought for quite a long while before I decide on the look of the layout I wanted. This time, it is a romantic and feminine look, using lots and lots of Webster’s stuff. I have used this week color palette posted by the Color Room. One of my favourite color palettes.

Piradee’s criteria were as follows:

  1. It must be a 12 X 12 paper layout
  2. You must use FABRIC on your page (this can be fabric, canvas, fabric paper, fabric flowers, etc) 
  3. There must be some SEWING or STITCHING on the layout.
  4. And include at least 1 HANDMADE flower too. The flowers can be made using fabric or paper or anything else you can think of. 

And here’s my take:


The roses

I have tried making roses with papers before but I can’t really remember the exact steps; only remembered folding and twisting and going round and round. But I dare myself to try on making some fabrics flowers. Dug through my fabric stash and found this nice pink one. Steps I used were very simple:

1. I cut long strips of the fabric of about 3 cm width

2. Fold the fabric along the length and sew a running stitch through (or if you can’t sew or want to be faster, you can use a strong glue to glue it down; I have tried and it works just as well too)

3. Fold down a portion at one end and coil up a few rounds to make the centre bud of the flowers.

4. For the petals round the bud, just twist the fabric and go round the bud and keep repeating this till you are satisfied with the size and look. It helps to glue down the fabric in midst of doing so as this helps to keep everything in place.

And if you could see from the photo, I have also used some pink frost stickles to go on top of the roses.

The belt

The next stitching I did was with the belt (left hand side of LO; glued to the pink polka dot fabrics). I cut a strip of cardstock, hand sewed the stitches on and put the heart buckle embellishment. Also added some eyelets.

The scroll

Roll up the pink polka dot Webster’s PP together with a sweet pinky note pad I got from NBC and tie it with lace ribbon.

The book

I love making this book. I have used the journal cards paper from Webster, stack them together and folded them. Secure with a string and distressed. Next, I die cut a green wool felt with Tim Holtz’alteration dies to make the book ‘flap’ thing. I have sewed a button on it as well.

The circular loop

I have used some lilac color paper string, plait it and glue down to the base Webster’s PP.

The overall LO (finally…)

Cut the pink dolly into half and paste across the Webster paper at the top and bottom. Then glue down the PP and fabric layers, dolly and all the embellishments made.

You can see that I made a veil for ‘myself in the photo’ using pink tulle.

Next, I framed up the photo with lace and also with another Tim Holtz die-cut.

As for the little ‘tiles’ next to the ‘belt’, these are from the Pink Paislee’s tape which I have cut out.

Oh, and another little good news to share with my readers. The LO posted in my very last blog was featured yesterday in MWL blog. Total of 2 LOs featured within a week span. These little accomplishment are truly encouraging in this path of creating.

Read Full Post »
Distressed


I did a lot of distressing with this LO I made last week. Poor fingers quite badly stained with the inks.

The photos are taken at the Zoo a few months back. We had a great time at the Zoo then but was not able to complete the tour of the whole Mandai Zoo as weather was super hot and all of us got really tired after around 3.5 hrs in the Zoo. Shall aim to make another trip to the Zoo by end of the year.


I have used Tim Holtz’s fence mask. I masked it with ‘Vintage Photo’ distressed inks and I also added stickles for some sparkle to the fence. 

As for the lace, I have also used the same distressed ink to distress the edge and I sprayed some water to let the color run to paint the whole lace.

And for the flowers, they are from Prima. I have distressed the white Prima flower with some water sprayed on. I have also distressed some white dolly and gathered into ruffles to attach to the Hambly Frame.

Lastly, I have inked the Pink Paislee Artisan Element with ‘Latte’ alcohol ink and attached to the corner of the photo.

Simple LO with lots of distressing though.

Read Full Post »

Oh Orange


This is my take on this week Color Room Challenge. I love orange. This can be justified by the fact that I painted my whole living room with two tones of orange 5 years back. 


This is my first time playing with tissue paper for my LO. I have lots of fun playing with them. It’s a cheap yet versatile material to use. 

Here’s what I did with them. I stamped the tissue paper with different words text stamps. Next, stamped over with birds and clock stamps. I have used coffee archival ink from Ranger for the stamping. I crumpled the tissue papers and spread them across the canvas which has the glue medium on. As I spread them, I created some creases for texture. I applied glue medium over the tissue paper to seal them in place. You can also see that I have applied some crackle paint over the tissue paper. These cracks appear beautifully visible on the tissue papers. 

I have actually created some prints on the canvas itself before placing the tissue paper. Here’s what I did: 

(a) Use toilet roll, dip onto some gesso and stamp on 2 corners of the canvas. 

(b) Use corrugated paper, applied some paint and stamp on the canvas. 

(c) Use some background stamp (netting-like background) and stamp on one corner. 

And one other interesting thing I tried with this LO was to create my own patterned paper (it’s the one with birdcage). I stamped the distress ink pads (spiced marmalade, rusty hinge and antique linen) on the craft mat and sprayed water on them and ‘smooch’ the white un-textured cardstock on the inked craft mat. I distressed and inked further with spiced marmalade. Next, I stamped the bird cage, using also the secondary images to give some faded look. 


For this LO, I have aimed to used different texture materials. Was glad to find the orange fibers from Basic Grey and the orange mesh from a floral shop to use for this LO. Also, was happy to be able to incorporate in the Tim Holtz die-cut (I have use grunge paper for the die-cut. Emm, sorry for sounding like a crazy Tim Holtz’s fan lately but really, I am one J ). 

As for the acrylic wing, I first inked with yellow and copper alcohol ink, followed by outlining with icing stickles. The tag ‘on to’ was engraved using Melody Ross Chip Art tools.  I have also stamped a phrase on the top right corner of the photo. 

And for those little ruffles, I have used the words tape from 7 Gypsies to create them. 


I have so much fun doing this LO. I don’t think it’s perfect to me but it’s my first time trying most of these techniques. I guess practice makes perfect. So, will explore and try on more of such pieces in future. 


Read Full Post »

Older Posts »